Shipyard - automated server builds as unique as you are
Anchor is full of smart people that hate boring work. Shipyard was created to relieve sysadmins of the mind-numbingly repetitive parts of server builds, leaving them free to do other things, like build more servers, or find more inventive ways to vent their rage through image macros.
This page makes use of the Seesaw plugin. Whenever you see a link preceded by » , that link will toggle the display of an annotation or other aid.

Contents
How shipyard fits into the workflow
Shipyard was designed to augment our existing L2 workflows as well as automate things. Once the sales team has hammered out a deal for the customer, they can input the tech specs directly into the system, then hand the build off for completion.
The end goal is to have end-to-end tracking and processing of server builds, from the time the customers e-signs the contract through to them receiving the handover email.
If you want more details, have a read of the related pages:
Assumed knowledge
- You know your way around the admin system, and understand basic concepts
- Tasks, and parent-child relationships for tasks
- Contacts
Our various product offerings, mostly VPS but ideally dedicated servers as well
Things you absolutely must know about shipyard, even if you think it doesn't apply to you
While shipyard has been created to be very robust, it interfaces with a lot of existing systems. This makes it susceptible to breaking in ways that aren't immediately obvious.
When a build is in progress (ie. still on the board and not yet marked Complete, it will interact with the admin system, provsys and RT, amongst other things. To avoid being set upon by rabid developers, we ask that you avoid certain actions:
- Don't merge related tasks in the admin system
- Don't rename related tasks in the admin system
- Don't delete related tasks in the admin system
- Don't rename any resources related to the build in the provisioning system
Workflow
Sales team creates a new order with the desired specs, notes for software to be installed, etc.
Extra servers may optionally be added to the same order, though in most cases one order == one server build.
- With the details now fixed, the order is passed to a sysadmin. This is handled by whoever is coordinating sysadmins, typically Pat.
- The sysadmin runs down the build sheet completing checklist items.
- The build will be passed to another sysadmin for QA before handover.
- Once the checklist is complete, the server build is all done and the customer has their server. Everyone can be happy.
Using shipyard - Sales
This section is not yet verified to be 100% accurate
Before you start:
- You must have an RT sales ticket, it will be linked to the build
- You are about to create an order. An order has one or more server builds attached to it
- Shipyard will create a new task in the admin system for the order, you'll specify a parent task if the order comes from an existing customer
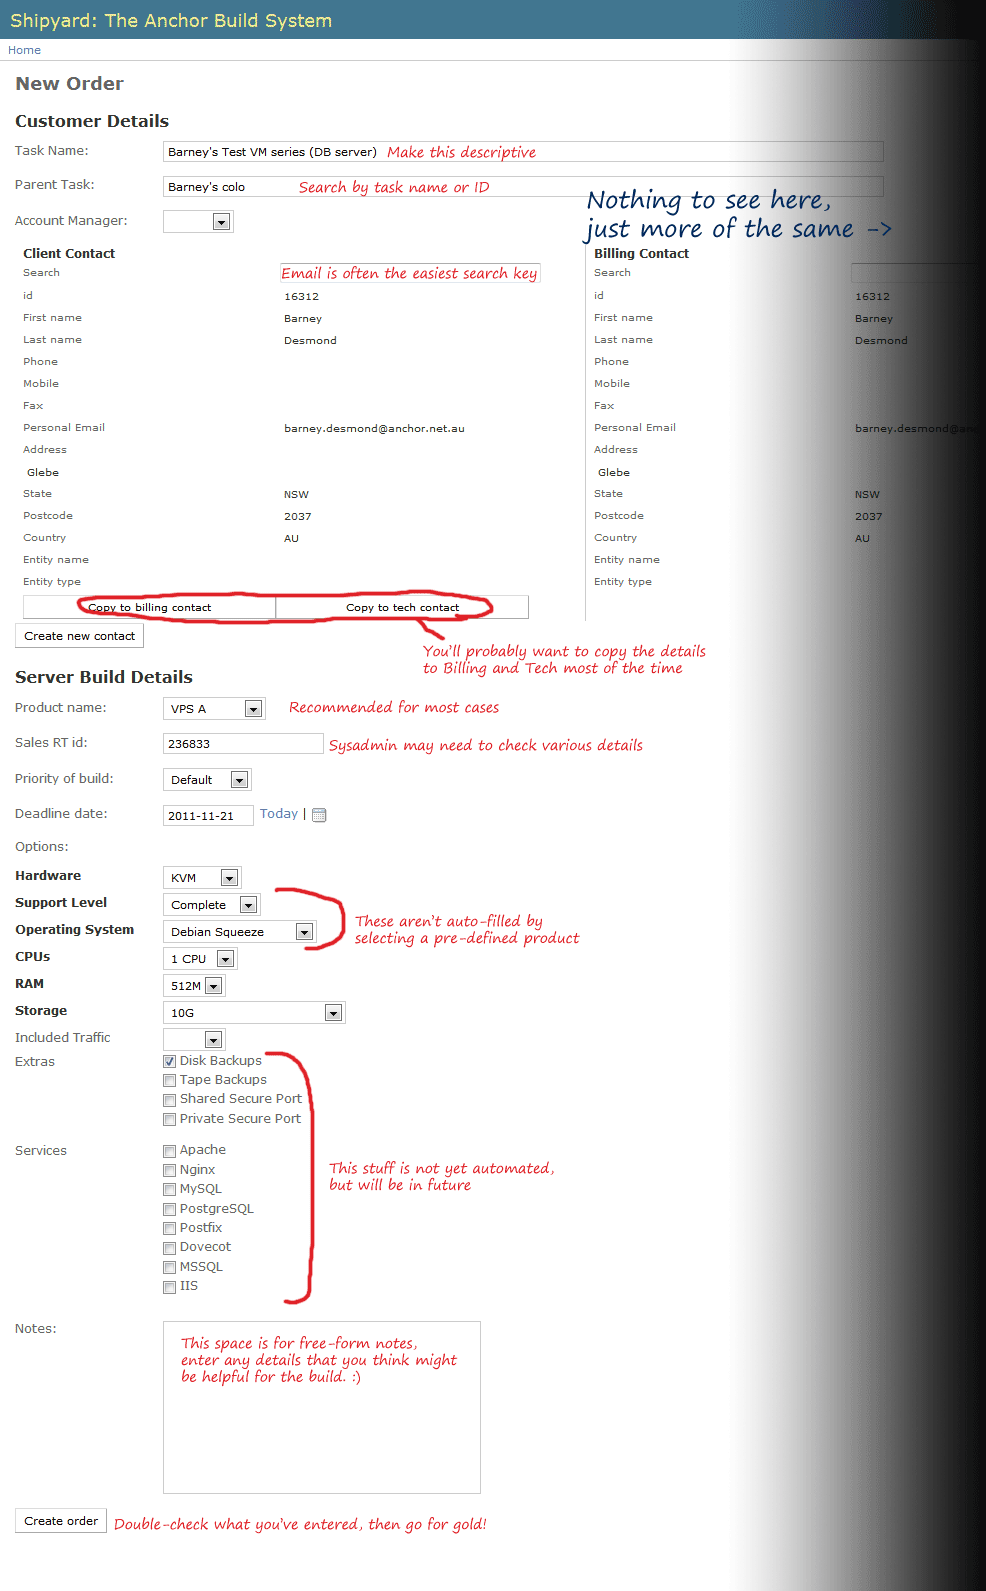
Now you're ready to create an order. Perhaps you'd prefer a more graphical reference? A handy »annotated screenshot of the New Order page is also available.

Head over to shipyard and follow the link to create a New Order
- If you're asked to login, use your LDAP username and password
- Provide a descriptive name for the new task that will be created in the admin system
- Fill in the name of a parent task if applicable. This is a magic autocomplete field, so let it do its job. You may find it easiest to enter the parent task ID as a search term
- Note the account manager for the task if applicable
- Prod a shipyard developer for assistance if you need a new account manager added
Starting at Client Contact, fill in the relevant details
For existing customers, use the magic autocompleting form field to search for the desired contact. Searching for their email address is usually the easiest mechanism, but you can also use their name or contact ID
For new customers, go ahead and use the Create new contact button
Unless the customer has specified other contacts, you should copy the contact details to the Billing and Tech contact fields using the provided buttons
Fill in the required hardware specs for the server. The Product name dropdown will prefill most of the important fields for you, and should be used unless you've negotiated something special (rare)
Provide the RT ticket number (eg. 123456) for the sales process. The sysadmin performing the build may need to refer to the details provided by the customer, so a reference to the ticket is vital.
Ensure that the remaining bold-titled fields are filled in (Support level and Operating system)
- Tick the checkboxes for any "application" components that the customer has asked for
- If there's no exact option available for what you need, please ask a shipyard developer for assistance. Incorrect details will cause confusion and errors when the server is being built
Provide as many extra details as necessary in the Notes field
Double-check your work, as it's not possible to change details of the order once it's submitted
Push the Create order button and ask a coordinator to assign the build to a sysadmin
Assign the sales ticket to the coordinator, and move it to the Provisioning queue
Does the customer's order require more than one server? Now is the time to add them to the order.
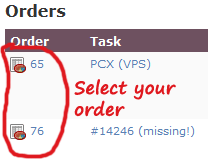
Go to shipyard and select the order you just created, check this »screenshot if you're not sure what you're looking for

Select the link for (new server build)
Fill out the details as before, then Add build to order
Using shipyard - Sysadmin
You'll receive a nudge (probably from Pat) that a build has been assigned to you. If you're lucky, you'll even get a link to shipyard. Head to the shipyard and check your list of outstanding builds.
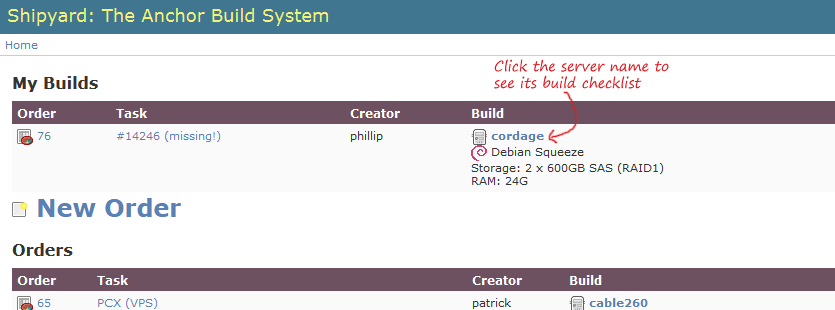
Find your server build and click its name to go to the checklist. It may be labelled "Unnamed" if a name hasn't yet been chosen. See »this screenshot if you're not sure what you're looking for.

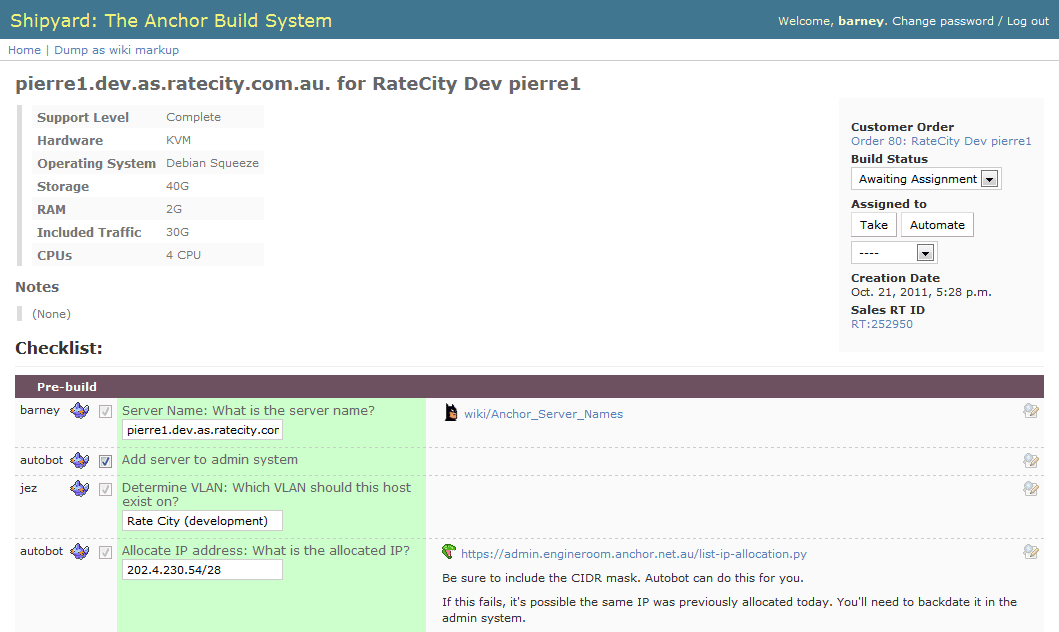
You should now see a checklist that look somewhat like »this one . The sales person or coordinator may have already filled some fields out for you.

How to use the checklist
- The checklist can only be modified by whoever the build is assigned to, which can be changed using the controls in the top-right corner
The Take button will assign the build to you, allowing you to complete the checklist (duh)
The Automate button will assign the build to a robot, which is where the magic begins...
There are keyboard shortcuts for the buttons, just type T or A respectively
- Checklist items are either a simple yes/no checkbox to indicate completion, or a text field with associated checkbox
You can't manually check a text field; type a value and hit <Enter> to "complete" the checklist item
Uncheck a text field by deleting the value and typing <Enter>
- When a checklist step is completed, the name of the person who completed it is recorded on the far left of the row
What about the robots? I was promised robots and blackjack
Each checklist step is deliberately very straightforward, and some are simple enough to be automated. You'll notice in the above screenshot that some of the steps were done by "autobot", that's the codename of our robot.
There's a little icon to the left of each checklist step which denotes whether it can be automated. It's both an indicator as well as a control, clicking the icon toggles its state.
 Mudkip
 - Displayed: This is the default state for all steps, and indicates that automation will be attempted
- Manually selected: Automate this step if possible
 L33t h4xx0r (that's you)
 - Displayed: This step cannot be automated, and requires a human to perform the work
- Manually selected: Do not attempt to automate this step
When ownership of the build is passed to autobot it will start at the top of the checklist and work its way down, attempting to perform any incomplete steps. You'll see it update the checklist in realtime. If it encounters any errors it will stop, highlight the failed step, and disown the build. If a step can't be automated it will stop and disown the build, and mark that step as needing human action.
Incomplete steps are not coloured |
Completed steps are highlighted in green |
In-progress steps are highlighted in yellow |
Failed steps are highlighted in red |
If there's anything you don't want autobot to do, click the icon next to that step to toggle the automatability flag. It will stop when it gets there and proceed no further.
Basic procedure
Take the build
- Read the specs and notes provided by the sales team, looking for anything that might need special attention. If there's any steps that shouldn't be automated, toggle them to "Human". See the next section for notes on special values
Click the Automate button and watch until autobot hits something that it can't do
Take ownership of the build again
- Either perform the step if it needs human interaction, or fix the problem so that it'll work
- If you fixed a problem, check and then uncheck the step to clear its state, ready for another attempt at automation
If you're stuck, your next port of call is the mudpuppy log on wench
less /etc/service/mudpuppy/log/logs/current # you can pipe this through tai64nlocal to get readable timestamps
If you need help figuring out the problem, ask a shipyard developer or another sysadmin who's experienced in its voodoo
Toggle the step away from "Human" if required, and click the Automate button again...
- Rinse and repeat until there's nothing you or autobot can do - typically when the server needs to be QA'ed. That's when you pass the build to a willing victim
- QA is easy:
Take the build if your fellow sysadmin hasn't already palmed it off to you
Enter your name in the box and press <Enter>
- Perform the QA process, linked from the checklist itself
- Get the other guy to fix any problems
- If it passes QA, check the box and return ownership of the build
Once the build is complete (all steps are highlighted green), change the Build Status to Completed from the dropdown at the top of the page. You are done!
Special build requirements
Shipyard has so far been written to streamline the most common/useful cases of VPS builds. In doing so it takes away a lot of the input that we used to provide, and replaces it with intelligence gleaned from provsys and the admin system.
Some customers will have special requirements that override the automatically chosen values, which we'll cover here.
- Server name
- Shipyard is tuned to find and use the next available VPS-series hostname. If you're building a dedicated server, or special VPS (eg. VPS on a dedicated hypervisor) then you'll need to specify your own name
Normally this is the short hostname, eg. beach100
Choosing Complete support level implies anchor.net.au for the domain name
Internal support level implies engineroom.anchor.net.au for the domain
If you specify a name with a trailing dot ('.'), it is assumed to be an FQDN. This is needed for special cases like servers that "live" in another (non-anchor.net.au) domain
- VPS hypervisor
- Shipyard will automatically choose a VPS host with spare capacity. Override this if your VPS needs to go on a specific server
- VLAN
Shipyard will use the vps3 VLAN by default. Some customers may require a specific VLAN because they have existing servers to connect to. Use the name from the Name column in the admin system
- IP address
Shipyard will choose the next free IP address in its default subnet. You may need to override this if you've chosen a specific VLAN or have other special requirements. Allocate the IP address yourself, and enter it here in CIDR notation (eg. 202.4.12.34/24)